
ASP.NET Core Filters: Making Request Handling Flexible and Manageable
In ASP.NET Core, filters are powerful constructs that make the application’s processing flow more flexible and manageable. A filter can intervene before, during, or after a specific operation, giving us control over the process. For example:
- Performing security checks before a user request reaches the controller,
- Logging actions after an action method executes,
- Returning a custom response when an unexpected error occurs.
Filters make these scenarios easy to manage.

In ASP.NET Core, there are multiple types of filters, and they execute in a specific order. This sequence ensures that the application flows consistently while also preventing unnecessary performance overhead. Therefore, filters contribute not only to efficiency but also to security, maintainability, and easier management of the application.
Another advantage is that they help eliminate repetitive code. For example, instead of writing the same logging logic inside every action or controller, we can define it centrally using a single filter.
It’s important to note that when a request reaches an ASP.NET Core application, it first passes through the middleware pipeline. Middlewares are application-wide rules (e.g., authentication, request pipeline management, global error handling, etc.). If the request successfully passes through these layers, it reaches the relevant controller or action method. This is precisely where filters come into play.
In short:
- Middleware → A chain of rules applied globally to the application.
- Filter → A set of rules applied specifically at the controller or action level.
Now that we understand the basic flow, let’s dive deeper into filters.
The Journey of a Request

I included this illustration to help visualize how a request is processed. As seen here, the first components to take effect are the application-wide rules (middlewares). After that, the request is subjected to the filters defined at the controller or action level of the endpoint it is routed to.
The term ‘rules’ mentioned here is not limited to security. In a broader sense, it can be thought of as additional operations, necessary checks, or various manipulations performed on the request/response.
Now that we’ve mapped out the journey of a request in our minds, we can start focusing on filters.
ASP.NET Core Filters
Filters allow us to intervene in the processing of a request. A filter can operate:
- Before the request reaches the controller,
- During the execution of the action method, or
- After the action method has executed.
Filters provide a powerful mechanism for:
- Performing authorization checks,
- Logging or monitoring,
- Handling errors centrally,
- Modifying the response,
- Centralizing repetitive business logic.
ASP.NET Core provides built-in filter types: Authorization Filter, Resource Filter, Action Filter, Exception Filter, Result Filter. Additionally, custom filters can be created to meet project-specific needs.
How Filters Work Together
Filters execute in a specific order, which ensures consistency and avoids unnecessary processing. To illustrate this, let’s use a real-life analogy:
Imagine ordering food at a restaurant:
- You place your order with the waiter.
- The waiter passes the order to the kitchen.
- The kitchen prepares the food. If ingredients are missing, the waiter informs the customer.
- If everything is fine, the prepared food is delivered to your table.
Now imagine the process being disorganized: the chef searches for ingredients before an order is placed, the waiter tries to serve dishes that don’t exist, or the order never reaches the kitchen. The workflow would break down.
Similarly, in software, middleware and filters must execute in the correct order to ensure predictable, manageable, and consistent behavior.
Types of ASP.NET Core Filters
- Authorization Filters
- Resource Filters
- Action Filters
- Endpoint Filters
- Exception Filters
- Result Filters
Authorization Filters
As the name suggests, these filters are defined to handle authorization. When defining Authorization Filters, the IAuthorizationFilter interface is used. The methods provided by this interface are implemented according to the desired logic (i.e., under which conditions you want to perform the validation).
Let’s define a filter that allows access only to users with a specific title.
public class TitleAuthorizeFilter : Attribute, IAuthorizationFilter
{
    private readonly string _requiredTitle;

    public TitleAuthorizeFilter(string requiredTitle)
    {
        _requiredTitle = requiredTitle;
    }

    public void OnAuthorization(AuthorizationFilterContext context)
    {
        var user = context.HttpContext.User;

        if (!user.Identity?.IsAuthenticated ?? true)
        {
            context.Result = new ForbidResult();
            return;
        }

        var userTitle = user.Claims.FirstOrDefault(c => c.Type == "Title")?.Value;

        if (userTitle == null || !string.Equals(userTitle, _requiredTitle, StringComparison.OrdinalIgnoreCase))
        {
            context.Result = new ForbidResult();
        }
    }
}
In this filter, access to the specified controller or action method is granted only if the user has the required title. Examining the code, we can see that it derives from the Attribute class. The reason for this is, as the name suggests, so that it can be used as an attribute. We use the IAuthorizationFilter interface because an authorization filter should execute first. This ensures that the filter we create runs before other filters.
// Usage
[]
public IActionResult ProfessorPage() => View();
[]
public IActionResult StudentPage() => View();
Here we can see an example of its usage. When the request’s endpoint is ProfessorPage, the user making the request must have the title “Professor”; the same applies for the student endpoint. These examples can be further customized. Filters that require services can also be used, depending entirely on the specific needs.
Now, let’s move on to the second type of filter: the Resource Filter.
Resource Filters
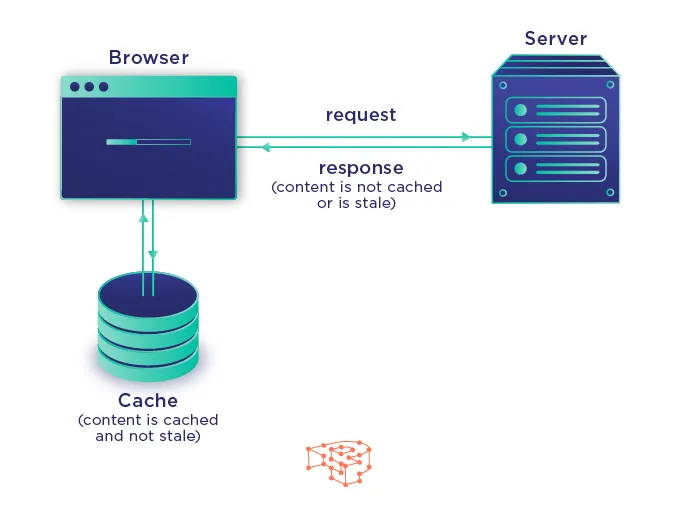
Resource Filters are a type of filter that can execute before and after an action method is called. This filter type is generally used in scenarios involving data or resources to be processed. By “data to be processed,” I mean situations where, for example, an endpoint receives frequent requests and the data at that endpoint is mostly static, i.e., it doesn’t change over time. In such cases, instead of retrieving the data from the database on every request, we can speed up the system by serving it from a cache.
For example:
public class CacheResourceFilter : IResourceFilter
{
private readonly IMemoryCache _cache;
public CacheResourceFilter(IMemoryCache cache)
{
_cache = cache;
}
public void OnResourceExecuting(ResourceExecutingContext context)
{
var key = context.HttpContext.Request.Path.ToString();
if (_cache.TryGetValue(key, out string cachedResponse))
{
context.Result = new ContentResult
{
Content = cachedResponse,
ContentType = "text/plain"
};
}
}
public void OnResourceExecuted(ResourceExecutedContext context)
{
if (context.Result is ContentResult result)
{
var key = context.HttpContext.Request.Path.ToString();
_cache.Set(key, result.Content, TimeSpan.FromMinutes(5));
}
}
}
// Controller usage
[]
public IActionResult GetData()
{
return Content("Veri: " + DateTime.Now);
}
In this example, the cache is checked first before the action executes; if the relevant data exists in the cache, it is returned directly from the cache. If the data is not in the cache, the action runs, and the resulting data is then written to the cache. This way, for the next request to the same action endpoint, the data is served directly from the cache, no database request is made, and the response is generated faster.
Another advantage of using a Resource Filter relates to the model binding process. Model binding is the process of automatically deserializing data from an HTTP request (usually JSON or form data) into action method parameters. This process incurs additional CPU and memory costs. Model binding occurs after the resource filter stage. If we handle the incoming request with a resource filter and short-circuit it, the model binding step is completely bypassed, preventing unnecessary CPU and memory usage.
In our example, we are also short-circuiting by returning the data directly from the cache.
Action Filters
An Action Filter is a type of filter that executes before or after an action method is called. Running either before or after the method allows for more effective manipulation.
For example, when it runs before the method (in the OnActionExecuting method), we can check the validity of the request (e.g., whether the encrypted-value exists in the Request Header), perform logging, manipulate the request, or validate the model.
When it runs after the method, we can modify the action’s result or add information to the response.
Let’s look at some examples of Action Filters. Suppose we want to measure the execution time of certain endpoints. We could implement this on a per-method basis using Stopwatch(). However, if we need to do the same for multiple methods, we would end up with repetitive code. This problem can be solved elegantly using Action Filters.
public class ExecutionTimeActionFilter : IActionFilter
{
private Stopwatch _stopwatch;
public void OnActionExecuting(ActionExecutingContext context)
{
_stopwatch = Stopwatch.StartNew();
}
public void OnActionExecuted(ActionExecutedContext context)
{
_stopwatch.Stop();
var elapsedMs = _stopwatch.ElapsedMilliseconds;
var actionName = context.ActionDescriptor.DisplayName;
Console.WriteLine($"Action '{actionName}' took {elapsedMs} ms.");
}
}
// Usage
[]
public IActionResult Index()
{
Thread.Sleep(500);
return View();
}
Here, we can measure the execution time on a per-method basis. If we want to measure the execution time of all actions in our application, we can add the following code to Program.cs:
builder.Services.AddControllersWithViews(options =>
{
    options.Filters.Add<ExecutionTimeActionFilter>();
});
Here we might ask ourselves: Could we have written a middleware instead of an Action Filter to measure execution time?
We could, but the measurements would be different.
This is because a timer implemented in middleware measures the entire pipeline (including the execution time of all actions, middleware, and filters), whereas a timer implemented as a filter measures only the execution time of the action itself. Therefore, it’s important to define our goal correctly.
I’d like to give one more example of an Action Filter. In an API project, we use DTOs as endpoint parameters, and these DTOs are processed in the service layer according to our purpose. During this process, we always need to check whether the DTO is null and whether validation passes. Instead of performing these checks in every method, we can manage them centrally using an Action Filter. Let’s write an Action Filter:
public class ValidationFilterAttribute : ActionFilterAttribute
{
public override void OnActionExecuting(ActionExecutingContext context)
{
var controller = context.RouteData.Values["controller"];
var action = context.RouteData.Values["action"];
// Iterate through endpoint parameters
foreach (var arg in context.ActionArguments.Values)
{
// Target DTOs
if (arg != null && arg.GetType().Name.EndsWith("Dto"))
{
if (arg == null)
{
context.Result = new BadRequestObjectResult(
$"DTO is null\nController: {controller}\nAction: {action}"
);
return;
}
if (!context.ModelState.IsValid)
{
var errors = context.ModelState.Values
.SelectMany(v => v.Errors)
.Select(e => e.ErrorMessage)
.ToList();
context.Result = new UnprocessableEntityObjectResult(errors);
return;
}
}
}
}
}
// Usage in Controller
[]
public IActionResult CreateUser(UserDto dto)
{
...
}
In this example, instead of the IActionFilter interface, I used the ActionFilterAttribute class. This class already implements the IActionFilter interface. Additionally, since it is an Attribute class, we can apply it directly wherever needed.
If we had implemented IActionFilter manually, we would have had to use [TypeFilter(typeof(ValidationFilter))].
By using the ActionFilterAttribute class, we can take advantage of the simpler [ValidationFilter] syntax.
Endpoint Filters
Endpoint Filters are structures in ASP.NET Core Minimal APIs that allow us to perform various manipulations before or after a specific endpoint executes. Endpoint Filters can be considered the Minimal API equivalent of Action Filters.
// Minimal API

var builder = WebApplication.CreateBuilder(args);
var app = builder.Build();

app.MapGet("/colorSelector/{color}", (string color) => $"Color specified: {color}!")
    .AddEndpointFilter(async (context, next) =>
    {
        var color = context.GetArgument<string>(0);

        if (color == "Red")
        {
            return Results.Problem("Red not allowed!");
        }

        return await next(context);
    });

app.Run();
As can be seen from the example, when the value “Red” is received, an error is returned; in other cases, the endpoint functions normally. Since the logic is the same as Action Filters, it is quite easy to understand.
Exception Filters
An Exception Filter is a filter that is triggered when an unexpected error (exception) occurs while an action is executing. It can be defined at the controller, action, or application-wide level. It operates within the MVC pipeline, meaning it can only catch errors that occur at the controller or action level. For example, it cannot catch errors occurring in middleware, model binding, or any code outside the controller.
One might ask, “Why can’t it catch errors that occur during model binding?” The reason is that an Exception Filter only runs after the action has started executing. Therefore, even if an error occurs during model binding, the Exception Filter has not yet been invoked and cannot catch it.
We might want to perform specific logging at the level of a particular controller or action.
public class CustomExceptionFilter : IExceptionFilter
{
private readonly ILogger<CustomExceptionFilter> _logger;
public CustomExceptionFilter(ILogger<CustomExceptionFilter> logger)
{
_logger = logger;
}
public void OnException(ExceptionContext context)
{
_logger.LogError(context.Exception, "An error occurred in a critical action!");
context.Result = new ObjectResult(new
{
Message = "An error occurred in a critical action. Please try again."
})
{
StatusCode = StatusCodes.Status500InternalServerError
};
// Here we indicate that the exception has been handled,
// preventing it from propagating to other exception filters or middleware.
context.ExceptionHandled = true;
}
}
// Example Action
[]
[]
public IActionResult Create(Product model)
{
if (model == null)
throw new ArgumentNullException(nameof(model));
return Ok(model);
}
In the example above, we can use this structure to perform endpoint-specific logging.
Result Filters
A Result Filter is a filter in ASP.NET Core used to manipulate the result returned after an action has executed. It allows us to perform various operations after the action method produces a result, but before — or immediately after — the response is sent to the client.
For example, on an endpoint where personal data can be updated, we might want to include additional information such as the update timestamp and the operation status. In such cases, a Result Filter can be used.
public class PersonalDataLoggingFilter : IResultFilter
{
    private readonly ILogger<PersonalDataLoggingFilter> _logger;

    public PersonalDataLoggingFilter(ILogger<PersonalDataLoggingFilter> logger)
    {
        _logger = logger;
    }

    public void OnResultExecuting(ResultExecutingContext context)
    {
        if (context.Result is ObjectResult objResult && objResult.Value is User user)
        {
            // Log when personal data is updated
            _logger.LogInformation("User {UserId} updated personal data at {Time}",
                user.Id, DateTime.UtcNow);

            // Add additional metadata to the response
            var responseWithMetadata = new
            {
                user.Id,
                user.Name,
                user.Email,
                UpdatedAt = DateTime.UtcNow, // additional info
                Status = "Success"            // additional info
            };

            objResult.Value = responseWithMetadata; // update the response
        }
    }

    public void OnResultExecuted(ResultExecutedContext context)
    {
        // Additional actions after the response has been sent can be placed here
    }
}
Usage in controller:
[]
[]
public IActionResult Update(int id, UserUpdateModel model)
{
var user = GetUserFromDb(id);
user.Name = model.Name;
user.Email = model.Email;
SaveChanges();
return Ok(user);
// The filter we created kicks in at this line and modifies the response
}
This diagram represents the journey of a request as it moves from the middleware pipeline to the filter pipeline. After understanding the filters I discussed in the article, I believe this visual becomes much more meaningful.

In this article, I aimed to share what I’ve learned about ASP.NET Core Filters. I hope it provides a general understanding and adds some value. Wishing you a great day!

Comments 0
You cannot comment because you are not logged in.
Log in to comment.